How to import and utilize custom decals into Gran Turismo 7
The ability to import custom decals from the comfort of your own computer gives Gran Turismo 7 a fantastic way to customize liveries. Here’s how to do it.
ShareTweetShareShareEmailIt’s a feature I wish was standard in every racing game, as I just don’t have time or patience to recreate logos through shapes and other objects like most racing game livery editors make you do.
The newly-released Gran Turismo 7 for the PlayStation 5 and PlayStation 4 consoles makes it somewhat simple to get your logo or a favorite decal of yours into the game to use on your custom liveries. It’s a process that was also in Gran Turismo Sport, but it’s a little different in the latest game with the whole World Map structure.
Today, I’ve put together a step-by-step process on how to get that perfect decal from your computer and onto your PlayStation console. In my opinion, the features make the whole process of custom liveries on Gran Turismo 7 the best in the console racing game industry.
STEP 1: UPLOADING THE DECAL FILE
This might be the trickiest part of the whole process, as up until five minutes ago, I had no clue how to save the decal in the proper format. It needs to be saved in vector format, specifically a .svg file (scalable vector graphic).
This as opposed to something like a .PNG or .JPG allow for the decal to be resized without losing the integrity of the image, it’s not pixel-based.
Programs such as Adobe Illustrator have the ability to save the decals in the proper format. That’s what I used, personally. This might be an immediate hang-up, but there are free programs such as Inkscape that will work just the same.
The only requirements are that the .SVG file is saved as a version 1.0 or 1.1 file and cannot exceed 15kb in size.
Log in to your PlayStation account on the Gran Turismo website by clicking on “My Page” in the Top right corner. Once you get in there, you’ll notice a couple of things.
The ‘Gallery’ takes you over to view and share any scapes or photos you’ve shared. We’ll get to that later, but the important task, for now, is to go to the Decal Uploader.
In there, it’s as easy as finding your file and uploading it. You can drag and drop it or open up your file browser.
Once it’s uploaded, give it a proper name and send it off. You can upload as much or as little as you prefer, and once that’s done, it’s time to move over to your PlayStation console.
STEP 2: FINDING THE DECAL LAYERS
Once you’ve got your logos imported properly, it’s time to go find them and utilize them for livery purposes. In Gran Turismo 7, the GT Auto pavilion of the map takes you to the customization area. While you’re there, don’t forget to change the oil and give your ride a wash…
Now, if it’s car liveries you’re looking to do, click on the second option, “Customize Cars”. You could also go and customize a racing suit or helmet with your logos, but today I’m here for car liveries.
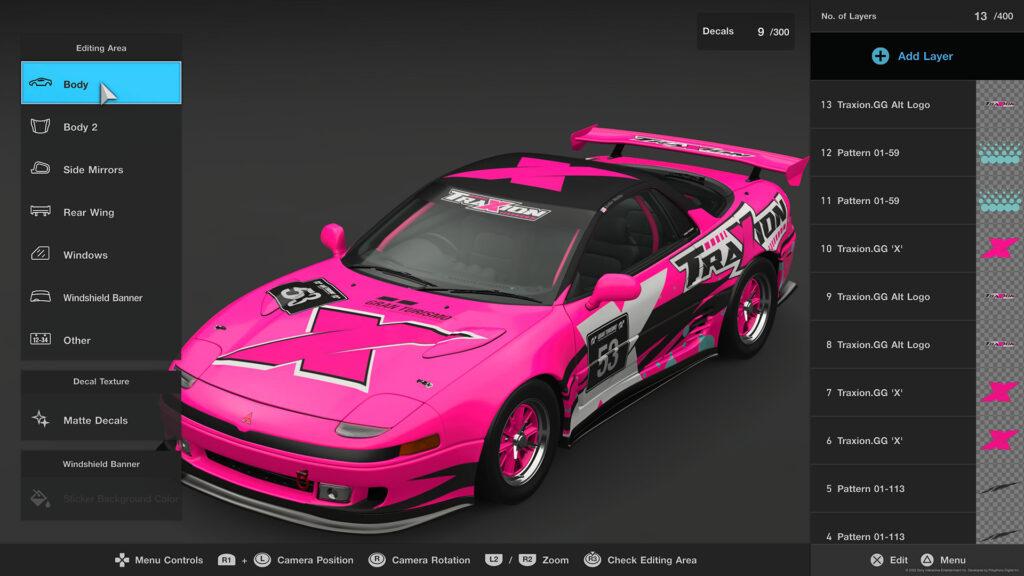
The next screen will give you different options, such as wheels, paint colors, custom parts, so on and so forth. The one we’re looking for is the Livery Editor option. Click on that, then if you have a design you’ve saved or are looking to create a new one, click on the option that suits you here.
I’ll be working on a new one today for the 1991 Mitsubishi GTO Twin Turbo in my garage. I’ve got other cars, but this one looks like a fun one to sticker up. I feel like we can really represent the Traxion.GG brand well on a canvas like this.
Once you get into the paint booth, or rather the Livery Editor, you’ll see more options to choose from. You can pick your base color, set up any of the race-specific options available, or change the way the editor is presented. For now, I just want to get to those decals, so I’ll pull up the decal menu.
There are multiple places to place your decals. Choose an editing area, then on the other side of the screen, click on “add layer”. You can select where you want the camera to look for some of these editing areas. Once that’s figured out, click “select decal”.
Now comes the part we’ve been waiting for.
In the decal screen, you’ll first see the preset decals. From shapes, patterns, fonts, logos and other racing decals, there’s already a lot to play with in the Gran Turismo livery editor. On the left hand side menu, you’ll see My Library with My Items. Click on that.
If they were successfully uploaded on the Gran Turismo website, you’ll now see them here. Pick the one you want, and voilà. Now you’ve got your decal, logo, layer, whatever you want to call it, up on screen.
From there, happy painting! Place the logos as you see fit, and come up with whatever you can come up with. Even for non-artistic painters like myself, the Gran Turismo 7 Livery Editor makes it pretty easy to make anything look good.
STEP 3: SHARING THE DECAL LAYERS
Now, if you’re feeling generous and would like to share your decal with the world, there is a way to do so through the Showcase.
In the bottom left portion of the World Map, click on Showcase. Once again, on the left menu, you’ll see “My Library” and “My Items”. Click on your items, and anything you’ve saved or uploaded, whether it’s a decal or a scape or an in-race photo or whatever will be here.
Find your decal and click on it. On the next screen, you’ll see the desired “Share” icon.
You can rename the file if what you put in while uploading was incorrect, or misspelt. It also requires a message, perhaps a description of what the decal is.
Under the message, there are three search tags you can input. The search function only allows alphanumeric characters, no spaces or symbols.
Once you have that all filled out, you can go ahead with the upload. This adds to the ecosystem of shared content created by the users themselves to add on to what Gran Turismo 7 doesn’t already have.
If you do a content search on your search tags, you’ll be able to see that your decals were shared successfully. You can also search and collect any other content that others have uploaded.
If you’d like to find the Traxion.GG decal, simply search ‘Traxion’ within the Showcase area and you too can use it on your designs.
STEP 4: CREATE A MASTERPIECE
Well, I’m no paint scheme expert like Traxion.GG contributor DriveThrough, but it was still a fantastic time creating my first livery on the platform. Using the content search for decals, I picked out other neat things from the community, as well as the logos I uploaded.
That ability to upload and share decals, logos, layers, etc. gives the Gran Turismo 7 the edge over most other racing games in the console game genre.
While it’s still possible to get really beautiful liveries on games such as Forza Horizon 5 and GRID Legends, I think Gran Turismo 7‘s level of customization and ease are unmatched.
Speaking of DriveThrough, it turns out that while I was working on this guide, he was streaming on the Traxion.GG Twitch and creating his own Traxion.GG schemes on GT7. We’ve highlighted that portion of the stream, so definitely go check it out if you haven’t yet already.
Have you been able to make a perfect livery yet on Gran Turismo 7? Hit us up on our social media and show off what you’ve got! The Traxion.GG GTO is the first of many custom liveries I plan to make in this game. Next up for me, a fully custom Ford Mustang… Keep it pinned.
Related Items:Featured, Gran Turismo 7, Guide, PlayStationShareTweetShareShareEmailComments
